Water drainage from a neighbor’s property can transform your peaceful yard into a soggy mess, threatening your landscape, foundation, and peace of mind. As Maryland, Virginia, and DC’s trusted drainage specialists, we’ve helped countless homeowners resolve these frustrating situations with practical, effective solutions.
Whether you’re dealing with occasional runoff after heavy rains or persistent flooding issues, this comprehensive guide will walk you through six proven methods to redirect water, protect your property, and maintain good neighborly relations.
Understanding Water Drainage Issues Between Properties
Before implementing any solution, it’s crucial to understand the dynamics of water drainage between properties and approach the situation methodically.
Drainage problems generally fall into two categories: surface drainage issues caused by visible runoff, and subsurface drainage problems caused by groundwater movement beneath the soil.
Legal Considerations Before Taking Action
In Maryland, Virginia, and DC, water drainage laws follow the “reasonable use” doctrine, which means property owners can make reasonable modifications to their land even if it affects water flow, provided it doesn’t cause substantial harm to neighboring properties.
Before implementing any drainage solution, consider these legal points:
- Check local ordinances and HOA regulations about drainage modifications
- Understand that you generally cannot redirect water in a way that causes new damage to other properties
- Document the existing drainage issues with photos and videos, especially during rainfall
- Consider consulting with a property attorney if the situation involves significant damage or neighbor disputes
- In Maryland specifically, property owners may be liable if they alter natural water flow in a negligent manner
If you’re unsure about the legal implications of your planned drainage solutions, our team at Blue Collar Scholars can help you navigate these considerations during a free consultation.
Assessing the Source and Severity of Drainage Problems
Effective drainage solutions begin with proper assessment. Take time to investigate:
- Water Source: Determine if the water is coming from surface runoff, downspouts, sump pump discharge, or natural groundwater
- Flow Patterns: Observe how water travels across your property during rainfall
- Volume: Estimate how much water typically accumulates
- Frequency: Note whether the problem occurs only during heavy rains or consistently
- Damage Assessment: Document any existing damage to your landscape, hardscape, or home foundation
A professional yard grading assessment can provide precise measurements of elevation changes and identify optimal drainage solutions based on your specific situation.
Solution #1: Installing French Drains Along Property Lines
French drains are among the most effective and aesthetically pleasing solutions for intercepting water at property boundaries before it can cause damage.
DIY Installation Guide
If you’re handy and want to tackle a French drain installation yourself, follow these steps:
- Plan the drain route: Mark a path that follows the natural slope of your yard, typically along the property line where water enters
- Gather materials:
- 4-inch perforated PVC pipe
- Landscape fabric
- Gravel (¾-inch washed stone)
- Sand (optional)
- Catch basin (optional)
- Dig the trench: Create a trench 12-18 inches deep and 12 inches wide with a consistent downward slope of at least 1% (1-inch drop per 10 feet)
- Line with fabric: Place landscape fabric along the trench with enough excess to wrap over the top of the gravel later
- Add gravel base: Place 2-3 inches of gravel at the bottom of the trench
- Install pipe: Place the perforated pipe with holes facing down on the gravel
- Cover with gravel: Fill the trench with gravel, leaving 2-3 inches of space below ground level
- Wrap and finish: Fold landscape fabric over the top and add topsoil or sod to conceal the drain
For optimal results, ensure the drain outlet directs water to an appropriate discharge point like a storm drain, dry well, or rain garden.
Professional Installation Cost Estimates
| Solution | Average Cost | DIY Difficulty | Effectiveness | Aesthetic Impact |
|---|---|---|---|---|
| French Drain | $1,500-$3,000 | Moderate | High | Low (Hidden) |
| Berm | $800-$1,500 | Easy | Medium | Medium |
| Swale | $1,000-$2,500 | Moderate | High | Medium |
| Retaining Wall | $3,500-$8,000 | Difficult | Very High | High |
| Permeable Landscaping | $2,000-$5,000 | Moderate | Medium | High |
| Trench Drain | $1,200-$2,800 | Moderate | High | Low |
Note: The costs shown above are general estimates for professional installation and do not include material variations or special site conditions. Material costs can fluctuate based on market conditions and quality selected. For a personalized quote tailored to your specific property conditions and project requirements, contact our drainage specialists. We provide detailed, no-obligation consultations to help you find the most cost-effective solution.
While DIY installation can save money, professional French drain installation ensures proper design, grading, and integration with existing drainage systems.
Professional French drain installation in the Maryland, Virginia, and DC area typically costs:
- Basic installation: $1,500-$2,500 for a standard 50-foot French drain
- Complex installation: $2,500-$4,000 for systems requiring multiple branches or overcoming difficult terrain
- Premium systems: $4,000-$7,000 for extensive drainage networks with catch basins and advanced filtrationFor accurate and up to date pricing, please contact us as prices are for general concideration and change depending on multiple factors.
Professional installation includes several advantages:
- Proper hydraulic calculations to handle specific water volumes
- Integration with existing drainage systems
- Access to commercial-grade materials and equipment
- Compliance with local codes and regulations
Our yard drainage specialists provide free on-site assessments to determine the most cost-effective approach for your specific situation.
Solution #2: Building Earthen Berms as Water Barriers
Earthen berms are raised soil barriers that redirect surface water around your property, offering a natural-looking solution that can enhance your landscape design.
Optimal Berm Height and Width Specifications
For effective water management, your berm dimensions should follow these guidelines:
- Height: 12-36 inches high, depending on the water volume (higher for larger volumes)
- Width: Base width should be 4-5 times the height (a 24-inch berm needs a 8-10 foot base)
- Slope: Gradual slopes of 4:1 or 5:1 (horizontal ) for stability and easy maintenance
- Shape: Curved or crescent-shaped berms work better than straight ones and look more natural
- Position: Place the berm perpendicular to the water flow, typically 5-10 feet inside your property line
Remember that the ends of your berm should curve inward toward your property to channel water in the desired direction rather than simply pushing it to another part of the property line.
Materials Needed and Step-by-Step Process
Creating an effective berm requires the right materials and proper construction techniques:
Materials needed:
- Compactable fill dirt (clay-loam mix works best)
- Topsoil
- Erosion control fabric
- Grass seed, sod, or other vegetation
- Landscape stakes and string
- Wheelbarrow, shovels, and tamper
Construction process:
- Mark the location: Use stakes and string to outline the berm location
- Prepare the base: Remove grass and loosen the soil along the berm path to improve bonding
- Add fill material: Build up the berm with compactable fill dirt, adding 6-inch layers at a time
- Compact each layer: Use a hand tamper or plate compactor to firmly pack each layer before adding the next
- Shape the berm: Create the desired profile with gradual slopes on both sides
- Add topsoil: Cover with 4-6 inches of quality topsoil
- Install erosion control: Use erosion control fabric on steeper portions until vegetation establishes
- Plant vegetation: Immediately seed or sod the berm to prevent erosion
- Mulch exposed soil: Apply mulch to bare areas to minimize erosion during establishment
For larger properties or significant drainage issues, consider combining berms with swales (shallow ditches) on the uphill side to better capture and direct water flow.
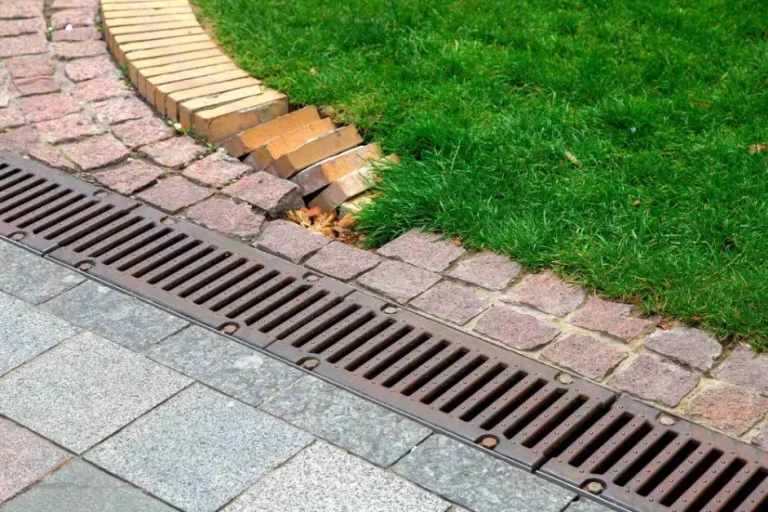
Solution #3: Creating Drainage Trenches and Swales
While French drains work underground, surface drainage trenches and swales manage water above ground, offering excellent solutions for larger volumes of runoff.
Trench Depth and Grading Requirements
Effective drainage trenches and swales must be properly sized and graded:
Drainage trench specifications:
- Depth: 12-24 inches deep, depending on water volume
- Width: 12-24 inches wide at the top, narrowing slightly at the bottom
- Slope: Minimum 1% grade (1-inch drop per 10 feet) with 2% preferred
- Lining options: Gravel-lined, vegetation-lined, or concrete/stone-lined depending on water volume and aesthetics
- Length: Extend the trench beyond the problem area to a proper discharge point
Swale specifications:
- Depth: 6-18 inches deep with gentle, sloped sides
- Width: 2-8 feet wide with 3:1 side slopes
- Shape: Parabolic or trapezoidal shape for optimal flow
- Vegetation: Typically grass-lined for residential applications
Proper discharge points include existing drainage ditches, dry wells, rain gardens, or municipal storm sewer systems (with appropriate permissions).
Maintenance Tips for Long-Term Effectiveness
Trenches and swales require regular maintenance to function properly:
- Regular inspection: Check for debris accumulation after storms
- Sediment removal: Remove accumulated silt and sediment annually
- Vegetation management: Mow swale vegetation regularly but never below 3 inches
- Erosion repair: Promptly address any erosion along the edges
- Inlet/outlet clearing: Keep intake and discharge points clear of obstruction
- Winter preparation: Clear fallen leaves before winter to prevent blockages
For gravel-lined trenches, expect to refresh the gravel every 3-5 years as finer particles accumulate and reduce drainage capacity.
Our professional landscaping team can incorporate maintenance of these drainage features into regular landscape service plans.
Solution #4: Implementing Permeable Landscaping Solutions
Strategic landscaping can significantly reduce runoff while enhancing your property’s beauty and ecological value.
Best Native Plants for Water Absorption
Native plants have adapted to local rainfall patterns and often feature extensive root systems that improve soil absorption capacity:
Maryland/Virginia/DC native plants for wet areas:
- Rain garden perennials: Swamp Milkweed, Blue Flag Iris, Cardinal Flower, New England Aster
- Water-absorbing shrubs: Buttonbush, Winterberry Holly, Sweet Pepperbush, Red Osier Dogwood
- Trees for wet soils: River Birch, Red Maple, Pin Oak, Bald Cypress
For maximum effectiveness, create designated rain garden depressions where water naturally collects. These specially designed planting areas typically feature:
- 6-12 inch depression
- Amended soil with high organic content
- Layered planting design with progressively drought-tolerant plants from center to edge
- 3-inch layer of hardwood mulch to prevent erosion
A properly designed rain garden can absorb up to 30% more water than a standard lawn of the same size, significantly reducing runoff from neighboring properties.
Permeable Paver Options and Installation
Replace impermeable surfaces like concrete with permeable alternatives that allow water to infiltrate:
Permeable surface options:
- Permeable pavers: Interlocking concrete pavers with gravel-filled joints
- Gravel grids: Stabilized gravel systems contained within cellular structures
- Pervious concrete: Specially formulated concrete that allows water penetration
- Rubber mulch paths: Recycled rubber mulch bound with resin for walking paths
For permeable paver installation:
- Excavate 10-14 inches deep
- Install geotextile fabric at the base
- Add 6-10 inches of clean, washed drainage stone (#2 or #3 size)
- Add 1-2 inches of smaller bedding gravel (#8 or #9)
- Install pavers according to pattern
- Fill joints with fine gravel
- Ensure proper edge restraints to maintain integrity
Permeable paving systems can absorb 3-8 inches of rainfall per hour, dramatically reducing surface runoff while providing functional outdoor living space.
For more sustainable landscaping options, visit our guide on sustainable landscaping practices.
Solution #5: Installing Retaining Walls for Water Management
Retaining walls serve dual purposes: they prevent erosion while creating level areas in sloped yards, and they can effectively block and redirect water flow from neighboring properties.
Material Options (Stone, Concrete, Timber)
Each retaining wall material offers different benefits for water management:
Stone walls:
- Dry-stacked stone: Natural appearance with built-in drainage through the cracks
- Mortared stone: More formal appearance, requires designed drainage outlets
- Stone veneer: Concrete block core with stone facing for structural strength and aesthetic appeal
- Cost range: $35-65 per square face foot
- Lifespan: 40+ years with proper installation
Concrete walls:
- Poured concrete: Highest strength, requires proper waterproofing and drainage design
- Concrete block: Economical with good drainage when properly designed
- Segmental retaining wall blocks: Pre-made blocks designed specifically for retaining walls
- Cost range: $25-50 per square face foot
- Lifespan: 50+ years with proper installation
Timber walls:
- Pressure-treated landscape timbers: Most economical option but shortest lifespan
- Railroad ties: Rustic appearance (note: older creosote-treated ties should be avoided)
- Cedar or redwood: Natural resistance to decay but higher cost
- Cost range: $20-35 per square face foot
- Lifespan: 10-20 years depending on conditions and material
For any water management retaining wall, proper drainage is crucial. Install drainage stone and perforated pipe behind the wall to prevent hydrostatic pressure buildup.
Professional vs. DIY Installation Considerations
Retaining wall installation complexity depends on several factors:
Suitable for DIY installation:
- Walls under 3 feet tall (in most jurisdictions)
- Level sites with good access
- Segmental block systems designed for DIY
- Timber walls under 2 feet tall
Professional installation recommended for:
- Walls over 3 feet tall (permits typically required)
- Walls managing significant water flow
- Sites with complicated grading or access issues
- Walls near property lines or structures
- Walls integrating with comprehensive drainage systems
Professional installation includes important elements often overlooked in DIY projects:
- Proper base preparation with compacted gravel
- Geogrid reinforcement for taller walls
- Engineered drainage systems behind the wall
- Correct backfill materials and compaction
- Proper stepping and transitions
Our retaining wall specialists provide free estimates for walls designed specifically for water management challenges.
Need repair work on an existing wall? We also offer retaining wall repair services to address leaning or damaged walls.
Solution #6: Discussing Drainage Issues with Your Neighbor
Sometimes the most effective solution starts with good communication. A collaborative approach can lead to more comprehensive solutions that address the root cause of drainage problems.
How to Approach the Conversation
Discussing property issues with neighbors requires tact and preparation:
- Document the issue first: Gather photos, videos, and possibly professional assessments before initiating the conversation
- Choose the right time: Approach your neighbor when they’re not busy or stressed
- Start positively: Begin with friendly conversation before transitioning to the issue
- Use “I” statements: “I’ve noticed water pooling in my yard after rainstorms” rather than “Your property is flooding mine”
- Show, don’t tell: Invite them to observe the problem during or after rain
- Focus on facts: Stick to observable facts rather than assumptions about causes
- Express concern, not blame: “I’m concerned about potential foundation damage” rather than “You’re causing damage to my house”
- Come prepared with options: Have some potential solutions in mind
Remember that your neighbor may be unaware of the drainage issue or its impact on your property. Approach the conversation with the assumption that they’ll want to help resolve the problem once they understand it.
Collaborative Solution Options
Working together often yields better results than individual efforts:
Shared solution possibilities:
- Joint French drain projects: Splitting the cost of a drainage system that benefits both properties
- Coordinated landscaping: Aligning landscape designs to manage water flow naturally
- Shared contractor costs: Bringing in professionals to address the root causes affecting both properties
- Easement agreements: Formal agreements allowing proper drainage across property lines
- Combined water harvesting: Systems that capture runoff for irrigation use
Collaborative approaches bring several advantages:
- Access to more comprehensive solutions
- Shared costs for larger projects
- Reduced risk of future disputes
- Potential for improved relationship with neighbors
- Better long-term outcomes for both properties
Our team can provide joint property assessments and neutral professional recommendations that address concerns on both sides of the property line which is perfect for Silver Spring’s varied topography and close-together properties.